(Link to the original tutorial on Github)
This tutorial describes how to install and run a Bitcoin Cash Node on a Raspberry Pi 4 running the 64-bit Ubuntu Desktop 21.04. This setup focuses on uses the Bitcoin Cash Node graphical user interface (GUI) so that you can visualize processes on the blockchain and your Bitcoin Cash wallet transactions.
These instructions are intended for those who have basic knowledge of the Ubuntu environment and familiarity with Linux commands.
Introduction
Bitcoin Cash Node is a node and wallet implementation for the Bitcoin Cash network. It downloads and, by default, stores the entire history of Bitcoin Cash transactions, which requires a few hundred gigabytes of disk space. Depending on the speed of your computer and network connection, the synchronization process can take anywhere from a few hours to a day or more.
Benefits of running a Bitcoin Cash Node
- Promote electronic peer-to-peer payments through active involvement.
- Contribute to the Bitcoin Cash network by letting others to use your node to broadcast transactions.
- Further decentralize the Bitcoin Cash blockchain, thereby improving reliability and security.
- Improve your understanding of how the blockchain technology of a top cryptocurrency works.
- Be part of the growing Bitcoin Cash community.
Prerequisites
- Raspberry Pi 4 (4 GB of RAM or more)
- Ubuntu Desktop 21.04 (RPi 4/400) (64-bit)
- microSD card (32 GB or more)
- Micro USB-C power cable
- Micro HDMI cable
- Monitor with an HDMI interface
- External SSD (500 GB or more)
- Keyboard (USB or Bluetooth)
- USB mouse (USB or Bluetooth)
- Raspberry Pi case with a GPIO fan and heat sinks (recommended)
- Reliable Internet connection
Note: For the data associated with the Bitcoin Cash blockchain, you should reserve at least 200 GB. Be sure your SSD is large enough to accommodate the growing blockchain if you want to keep verifying transactions for the foreseeable future on your Raspberry Pi.
Preparing your Raspberry Pi
Note: This tutorial assumes that you have already installed and configured Ubuntu Desktop 21.04 on your Raspberry Pi to your liking and have mounted the SSD to your Pi.
- For details on installing the 64-bit Ubuntu Desktop 21.04 on your Raspberry Pi, please see How to install Ubuntu Desktop on Raspberry Pi 4.
- For details on automounting your SSD in Ubuntu, please see How to properly automount a drive in Ubuntu Linux.
Check your Ubuntu architecture
Before you proceed, let’s make sure you’re running the aarch64 version of Ubuntu on the Raspberry Pi. Run the following command in Terminal.
uname -m
If aarch64 is not output, please follow the instructions in How to install Ubuntu Desktop on Raspberry Pi 4 and make sure to select the 64-bit option of Ubuntu Desktop.
Update and upgrade your Raspberry Pi and Ubuntu
After setting up Ubuntu Desktop 21.04 and automounting your SSD, let’s update and upgrade your Raspberry Pi and Ubuntu by running the following commands in Terminal.
sudo apt-get update
sudo apt-get upgrade
Setting up Bitcoin Cash Node
Download and extract the Bitcoin Cash Node package
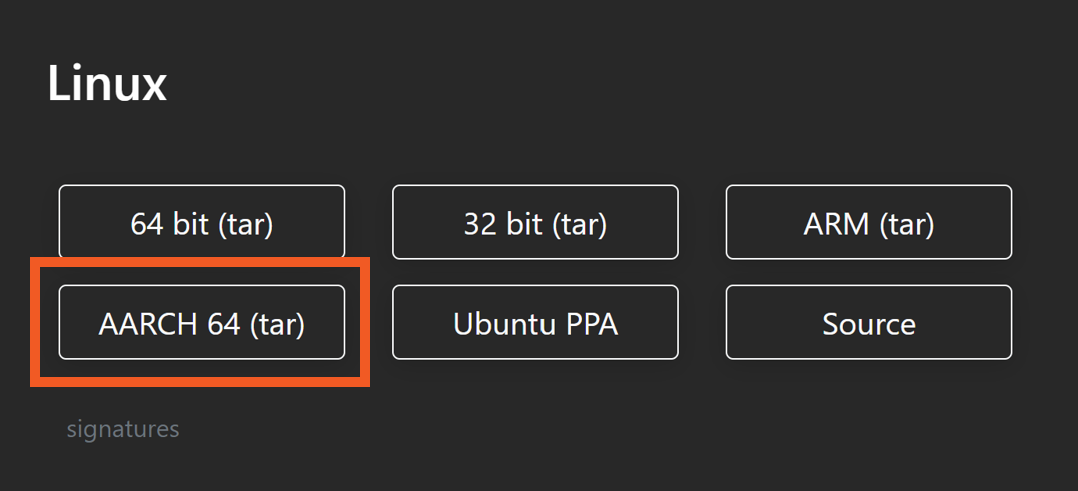
Open a web browser on your Raspberry Pi, and go to the Download page on the Bitcoin Cash Node website.
Under Linux, download the AARCH 64 (tar) package the home directory on your mounted SSD. Downloading this compressed package should take about 1 minute.
After the compressed package finishes downloading, let’s extract the compressed package.
To do so, let’s open Terminal and go to the directory where you downloaded the package to. Be sure to replace “SSD-directory-containing-downloaded-package” in the command below with the directory where you saved the compressed package to.
cd /"SSD-directory-containing-downloaded-package"
Next, let’s extract the compressed package. When running the following command in Terminal, be sure to replace “version-number-downloaded” with the version number that matches the package you downloaded.
sudo tar -xvzf bitcoin-cash-node-"version-number-downloaded"-aarch64-linux-gnu.tar.gz
While we’re in this directory, let’s create a new directory to store the blockchain data and keep things tidy. In Terminal, run the following command.
mkdir blockchain-data
Run Bitcoin Cash Node
Now that we’ve extracted the Bitcoin Cash Node package, let’s run the software and start downloading the transactions within the blockchain to your node.
Note: Downloading all the transactions in the blockchain will take a while. You may want to start the Bitcoin Cash Node software a couple hours before going to bed, as you may experience a slow Internet connection.
To start the Bitcoin Cash Node software, run the following command in Terminal.
sudo bin/bitcoin-qt
The Bitcoin Cash Node software then prompts us to specify where to download the blockchain transactions to.
Select Use a custom data directory, and click the three dots to choose a directory.
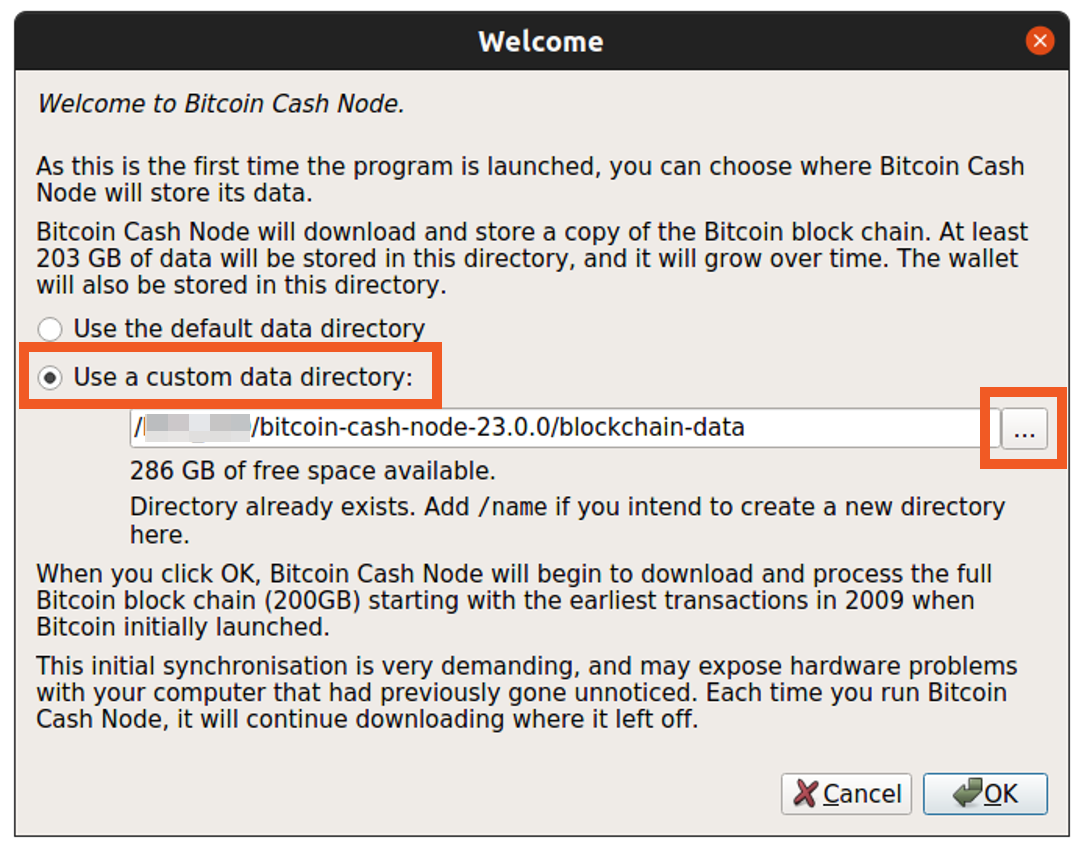
Navigate to your SSD, select the directory named blockchain-data that you previously created, and click OK. Then, click OK to begin downloading the blockchain.
The Bitcoin Cash Node software will then begin downloading transactions. This will take hours or days, depending on your Internet connection speed.
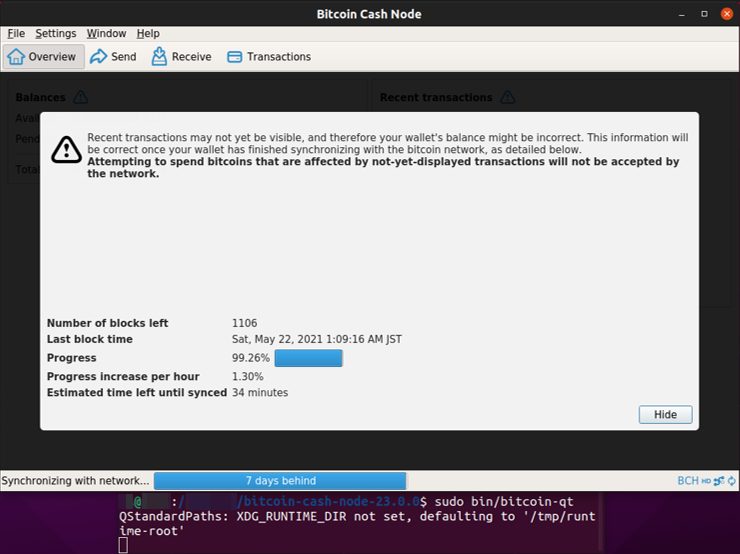
After all the Bitcoin Cash transactions have finished downloading to your SSD, you will see the following Overview screen and your node will automatically start verifying transactions on the Bitcoin Cash blockchain as they happen.

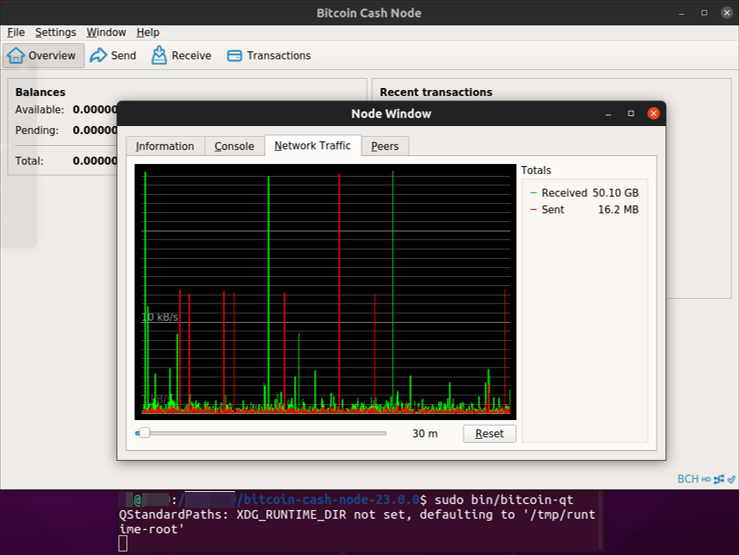
To monitor inbound and outbound traffic on your node, click Window in the menu bar and choose Network Traffic. From here, you can see how much data is being transferred to and from your node.
Note: The “Received” and “Sent” under “Totals” will reset if you restart the Bitcoin Cash Node software. Additionally, the network traffic will reset if you move the slider below the graph.
Setting up your Bitcoin Cash wallet
Your Bitcoin Cash wallet has already been created at this point, so let’s secure it with a password and back it up.
Attention: The instructions in this section are very important. Neglecting to secure your wallet with a password and backing it up could result in you losing the Bitcoin Cash that you receive from others.
Create a password for your wallet
Let’s secure your wallet with a password. You will need this password to restore it from the backup, which you will create after setting a password.
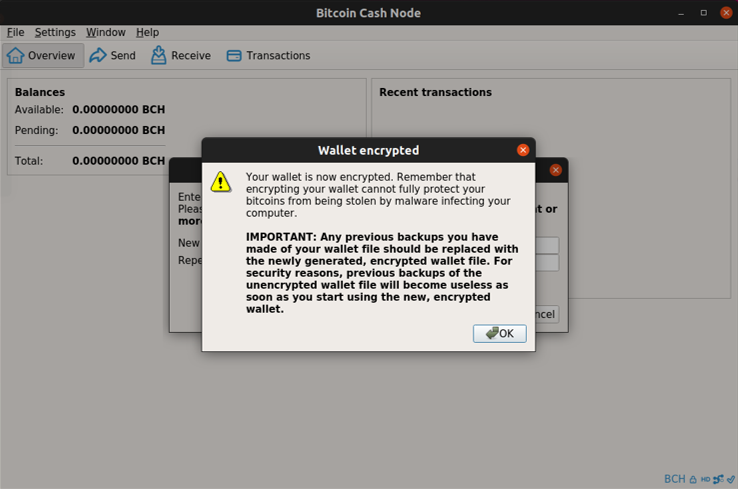
In the menu bar, click Settings, then select Encrypt Wallet. When the password setup window appears, enter a secure password. Enter the same password again to confirm it.
Attention: Be sure to remember this password. Write it down and put it in a safe, for example.
After you have successfully encrypted your wallet with a password, the following confirmation screen will appear. Please carefully read the notice, then click OK.
Back up your wallet
Now, let’s back up your wallet.
Backing up your wallet let’s you restore it if the device hosting your node and wallet encounters a catastrophic failure.
In the menu bar, click File and select Backup Wallet. When the directory window appears, choose a directory to save the wallet data (.dat) file to. If you don’t have your Raspberry Pi set up to communicate with other computers on your network, save the wallet file (.dat) to your Raspberry Pi first and then immediately save it to another device for safe-keeping.
Attention: Do not keep your wallet backup on the same device that hosts your node and wallet. If your device encounters a catastrophic failure, you will not be able to restore the wallet from the backup. Instead, save the wallet backup to a secure, reliable device or devices.
Once you have chosen a location, click OK.
Optional: Receiving Bitcoin Cash in your wallet
Finally, let’s test your wallet.
Click the Receive icon, and fill out the information as you need. All fields are optional and are for your reference.
At this point, a window will appear that shows you a QR code for someone to scan and send you Bitcoin Cash. Additional payment information include the URI, address, and wallet for the transaction.
Once someone submits a payment transaction to that payment request that we’ve generated, it will appear as “Pending” until it is validated by the blockchain.
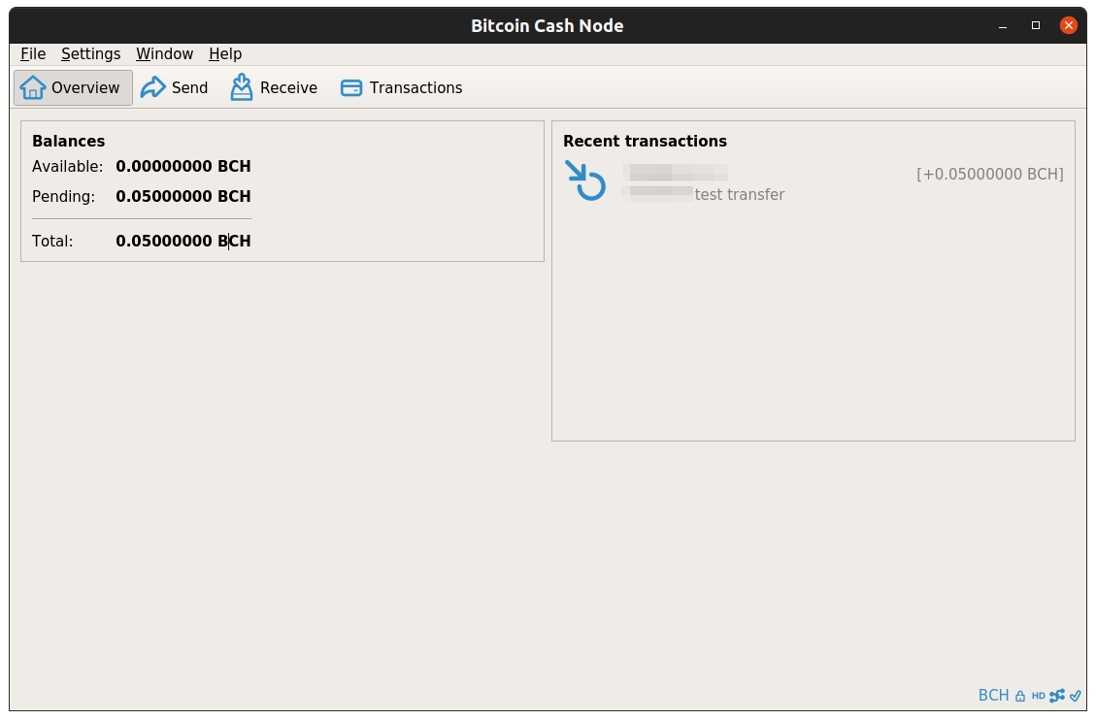
After a few minutes, you can see that the transaction has been validated and your Bitcoin Cash now appears as “Available” funds.
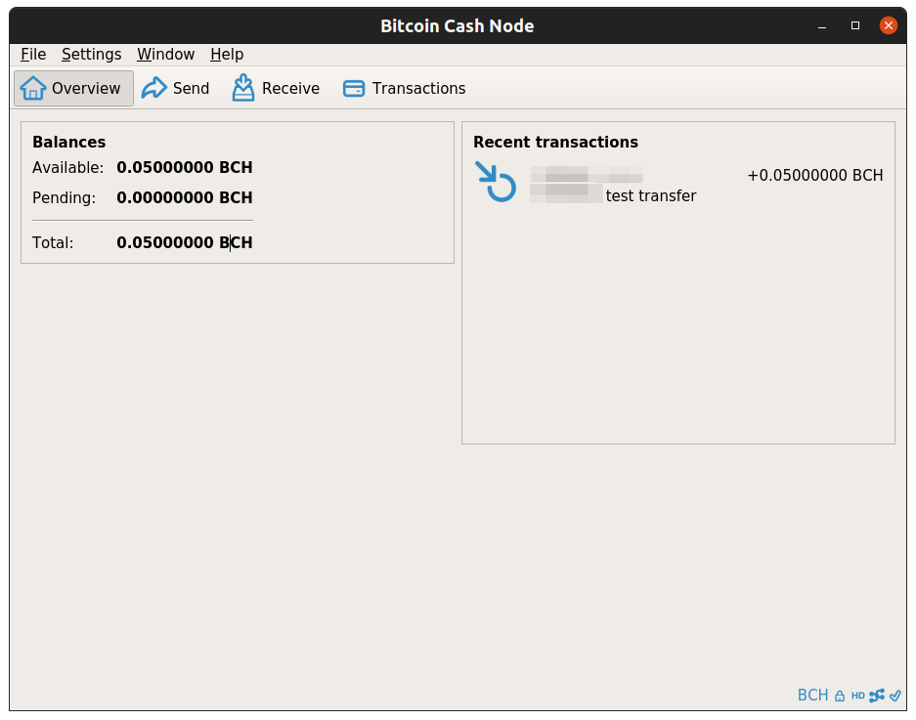
When the Bitcoin Cash has moved to your available balance, it is in your possession and you can send it to others, make payments, or save it.
Conclusion
You now have a full Bitcoin Cash Node on your Raspberry Pi 4 running Ubuntu Desktop 21.04.
With this full node, you are contributing to the Bitcoin Cash ecosystem by validating transactions and promoting the security and decentralization of the network. Additionally, with Bitcoin Cash stored in your wallet on the node, you have essentially become your own bank by owning your private keys and therefore your wallet.